

Abstract
This article examines the theoretical explanations and practical implementations of WebSocket protocol, and Socket.io library in Node.js using Binance API to show real-time stock prices within various initiatives and approaches that are being used from different perspectives.
Objectives of Study
The effective implementation and use of low-latency, bidirectional and event-based communication between a client and a server remain a major issue for the web industry. Whilst the technology underpinning Websocket has been around for well over a decade, there have been still misunderstanding about WebSocket protocols. The purpose of this study is to investigate the initiatives and approaches with three different repositories.
Theoretical Explanations
What is Websocket and how does it work?
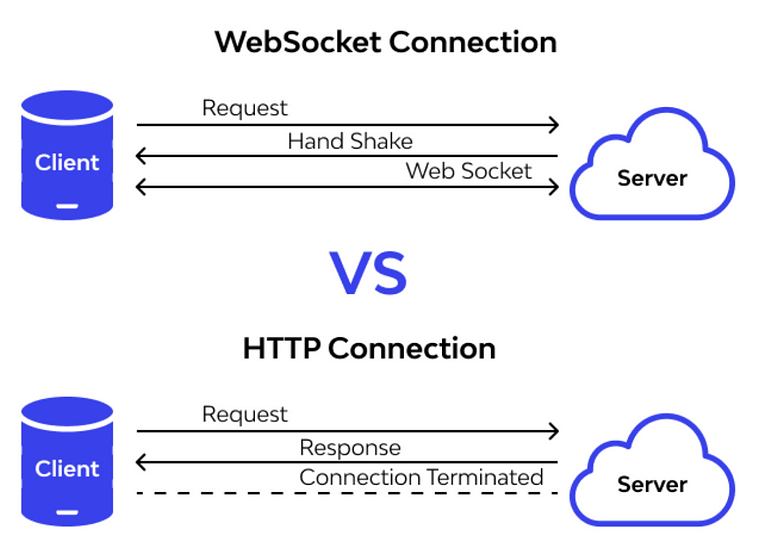
As it is known that REST API (Representational State Transfer) use HTTP request for the communication between server and client. In contrast, WebSocket is a communications protocol for a persistent, bi-directional, full-duplex TCP connection from a user’s web browser to a server. A WebSocket connection is initiated by sending a WebSocket handshake request from a browser’s HTTP connection to a server to upgrade the connection.
What kind of applications should use WebSockets?
- Chat Apps
- Real-Time Stock Prices
- Live Location Tracking on a Map
- Live Audience Interaction
- Online Auctions Bid Submission
- IoT Device Updates
What is Socket.io and How does it work?
Socket.io is a library that enables low-latency, bidirectional and event-based communication between a client and a server. It is built on top of the WebSocket protocol and provides additional guarantees like a fallback to HTTP long-polling or automatic reconnection. You can find more information here.
Practical Implementations
Part 1: Rendering stock prices with REST API by using Binance WebSocket
Initialize the project and install the required packages which are ws and express.
npm init
git init
npm install ws express
Create an index.js as a server.
// Package requirements
const WebSocket = require("ws");

// Node.js server requirements
const express = require("express");
const app = express();
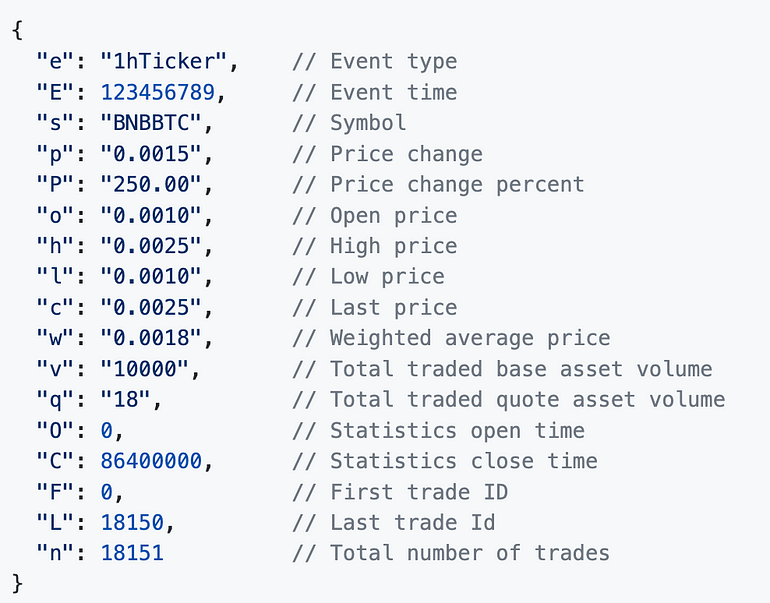
Get stock price data from Binance WebSocket as the ticker stream.
// Binance stream
const ws = new WebSocket(
  "wss://stream.binance.com:9443/ws/btcusdt@ticker_1h"
);
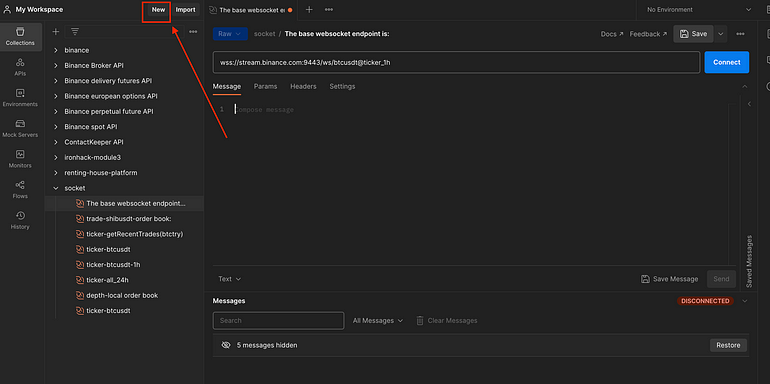
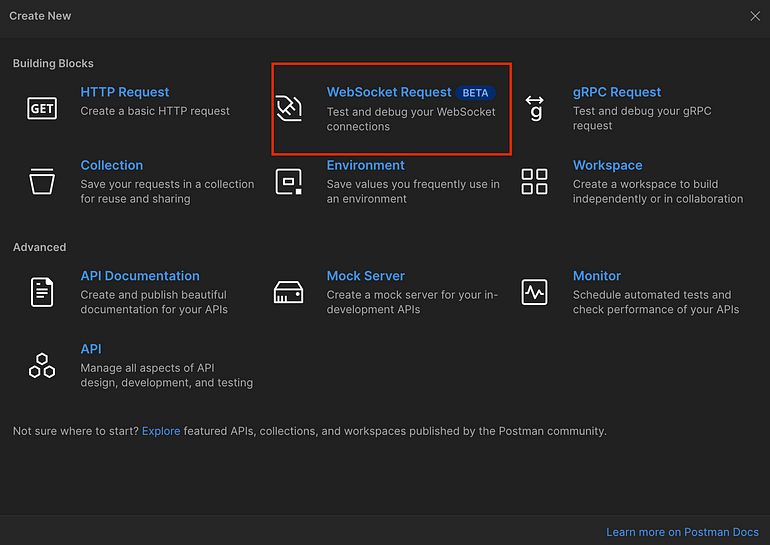
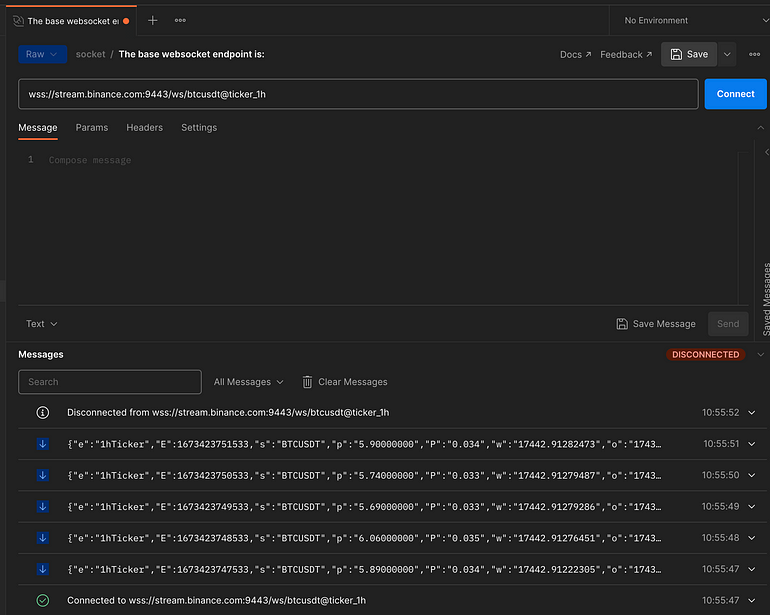
Check your stream data in the Postman to test it. You can follow the steps to learn how to use WebSockets in Postman:
Get data with WebSocket and write it into an empty array in order to render it later on the client.
// Define a new array to add stream data
let tickerData = [];

// Get data from stream with WebSocket
ws.on("message", function message(data) {
  let parsedData = JSON.parse(data);
  // Add data as json object to use GET API
  tickerData.push(parsedData);
});
Implement GET REST API and send the JSON data.
// GET API
app.route("/").get(function (req, res, next) {
  res.json(tickerData);
});
Create the port as 8080.
// Define server port as localhost:8080
app.listen(8080, () => {
  console.log(`Server listening on http://localhost:${8080}`);
});
When you run the server and open your localhost:8080, you can see the data on the browser like below:

To summarize those steps, the data was coming from Binance WebSocket as a stream and rendered with REST API. Nevertheless, this was a wrong procedure because the data should be rendered every second instead of sending a request to the server by using the reply button. If you work with WebSocket protocol to get data, you should proceed with it until the end. In order to render stream data as a live stream, either a WebSocket server might be created or a Socket.io library might be used to render data on the client as a live stream instead of HTTP protocol. Therefore, in the following steps, those two procedures will be implemented.
Part 2: Live stream by creating Websocket Server
Initialize the project again as a new project.
npm init
git init
npm install ws express
In this case, it is needed to create index.js as a server and also create index.html to render data with DOM manipulation. As an initial part, package and node.js server requirements should be typed.
// Binance WebSocket Stream Package requirements
const WebSocket = require("ws");

// WebSocket Server Requirement
const { Server } = require("ws");

// Node.js server requirements
const express = require("express");
const app = express();
Again, the WebSocket endpoint from Binance should be typed. In this case, the combined stream method is used to test it differently. You can add another stock symbol to add the second stream to the endpoint.
- The base endpoint is:
- Streams can be accessed either in a single raw stream or in a combined stream.
- Raw streams are accessed at /ws/<streamName>
- Combined streams are accessed at /stream?streams=<streamName1>/<streamName2>/<streamName3>
- Combined stream events are wrapped as follows: {“stream”:”<streamName>”,”data”:<rawPayload>}
// Get Binance Stream with WebSocket
const ws = new WebSocket(
  "wss://stream.binance.com/stream?streams=btcusdt@ticker_1h"
);
There will be two different ports while creating a WebSocket server. One of them is for listening on the browser, and the second one is creating your own WebSocket server between the front-end and back-end.
// Create WebSocket Server
const webSocketServer = new Server({ port: 8080 });
// Create Browser's Server
const server = express()
  .use((req, res) => res.sendFile("/index.html", { root: __dirname }))
  .listen(3000, () => console.log(`Listening on ${3000}`));
Then, send the stream data every second to the client by using the setInterval function.
// Send Data to the Client
setInterval(() => {
  webSocketServer.clients.forEach((client) => {
    // Send Data to the Client
    ws.on("message", function message(data) {
      let parsedData = JSON.parse(data);
      // Send the last price
      client.send(parsedData.data.c);
    });
  });
}, 1000);
Now, go to the index.html file and create a default HTML.
<!DOCTYPE html>
<html lang="en">
  <head>
    <meta charset="UTF-8" />
    <meta http-equiv="X-UA-Compatible" content="IE=edge" />
    <meta name="viewport" content="width=device-width, initial-scale=1.0" />
    <title>Document</title>
  </head>
  <body>
  </body>
</html>
In order to get the WebSocket stream, DOM manipulation should be implemented. After running the server, data will be coming from port 8080 and be rendered to the DOM. As below, there is a renderData function that implements DOM manipulation by changing the HTML element called number with id.
<body>
    <h1 id="stock-price">btcusdt@ticker_1h</h1>
    <div class="data">
      <p id="crypto-name">BTCUSDT</p>
      <p id="number">---</p>
      <script>
        const webSocket = new WebSocket("ws://localhost:8080/");

        function renderData(data) {
          const number = document.getElementById("number");
          number.innerHTML = data;
        }

        webSocket.onmessage = (event) => {
          const lastPrice = event.data;
          renderData(lastPrice);
          console.log(lastPrice);
        };
      </script>
    </div>
  </body>
When you open the browser with port 3000, data will be rendered like the below.
To summarize, in this part, the index.js server was started with port 3000. Then, Binance WebSocket stream data was received and sent to the client with WebSocket protocol as our own data, not anymore Binance’s data. Then, the client listened to the data from our own server and rendered it on the browser by using the WebSocket server (port 8080). This algorithm may be useful to use Binance data and change it for your own purposes. Sometimes, you may need this data and want to change something about it such as orders, fees, or even forecasting. If you want to directly use the WebSocket stream, you can use the Socket.io library which will be explained in the following part.
Part 3: Live stream by using Socket.io library with node-binance-api package
Initialize the project again as a new project. In this case, Socket.io and node-binance-api should be downloaded instead of ws.
npm init
git init
npm install express socket.io node-binance-api
Create index.js as the server, and then create a folder called public. Inside of the public, index.html should be created as the client. For functions, the js folder should be created and the main.js file should be created inside of the js folder.
index.js
public
 ┣ js
 ┃ ┗ main.js
 ┣ index.html
For the server, node.js requirements should be added.
// Node.js server requirements
const express = require("express");
const socketio = require("socket.io");
const app = express();
const path = require("path");
To define the Socket.io server, the createServer function should be used and io should be defined like the below.
// Configure socket.io server
const http = require("http");
const server = http.createServer(app);
const io = socketio(server);
To use a static folder for the client, it should be defined.
// Set static folder
app.use(express.static(path.join(__dirname, "public")));
In order to use node-binance-api package correctly, binance variable should be defined. If you do something about your user account, you should define your APIKEY and APISECRET in your .env file. However, you do not need to have them to render stream data. Therefore, they can be currently ignored.
// node-binance-api requirements
const Binance = require("node-binance-api");
const binance = new Binance().options({
  APIKEY: process.env.APIKEY,
  APISECRET: process.env.APISECRET,
});
Create a socket connection for the client and send the node-binance-api package’s data as it is defined in the package documentation.
// Run when client connects
io.on("connection", (socket) => {
  binance.websockets.miniTicker((markets) => {
    socket.emit("markets", markets);
  });
});
To listen to the server on the browser, the port should be defined.
// Define server port as localhost:3000
server.listen(3000, () => {
  console.log(`Server listening on http://localhost:${3000}`);
});
Create the client view.
<!DOCTYPE html>
<html lang="en">
  <head>
    <meta charset="UTF-8" />
    <meta http-equiv="X-UA-Compatible" content="IE=edge" />
    <meta name="viewport" content="width=device-width, initial-scale=1.0" />
    <title>Stock Ticker</title>
  </head>
  <body>
  </body>
</html>
In contrast to the previous part, the external js function called main.js is implementing Socket.io communication and DOM manipulation. Therefore, import main.js and initialize the Socket.io library into the HTML file.
  <body>
    <h1 id="stock-price">btcusdt@ticker_1h</h1>
    <div class="data">
      <p id="crypto-name">BTCUSDT</p>
      <p id="number">---</p>
    </div>
    <script src="/socket.io/socket.io.js"></script>
    <script src="js/main.js"></script>
  </body>
In order to use the Socket.io library, it should be defined in main.js. Moreover, the server is sending the data called markets which is the event name. Event names should be the same for the front-end and back-end socket communication. Hence, the socket is receiving the data with the “markets” event name. The remaining part is the DOM manipulation to render the data to the DOM.
const socket = io();

socket.on("markets", (data) => {
  renderData(data);
});

// Render ticker data
function renderData(marketData) {
  const number = document.getElementById("number");
  number.innerHTML = marketData.BTCUSDT.close;
  console.log(number);
}
When the server is run with node index.js, it will listen to port 3000 on the browser, and the data stream will be shown.
To summarize, Socket.io was used to send data from server to the client by using node-binance-api package. The package was automatically getting data from WebSocket and Socket.io was sending it to the client with the markets event name. This data was rendered to the DOM. In a nutshell, the data was just transferred from Binance to the client with the Socket.io library.
Source : bsc.medium

Founded in 2020, BSCNews is the leading media platform covering decentralized finance (DeFi) on the Binance Smart Chain (BSC). We cover a wide range of blockchain news revolving mainly around the DeFi sector of the crypto markets. BSCNews aims to inform, educate and share information with the global investment community through our website, social media, newsletters, podcasts, research, and live ask me anything (AMA). Our content reaches hundreds of thousands of global investors who are active in the BSC DeFi space.
BSC NEWS is a private news network. All posts posted by this user belong 100% to bsc.news All rights are reserved to BSC NEWS for more information about BSC NEWS contact BSC NEWS HERE.
